Home » Articles posted by Susan Galindo
Author Archives: Susan Galindo
Brick Laying – An Art That Requires Skill, Knowledge, and the Right Tools
Brick laying requires skill, knowledge, and the right tools. The basic bricklaying tools include pointed trowels, bolster chisels, and club hammers.
Start by attaching a line along the ground where you want to build your wall. This will serve as a guide for both the height and straightness of the brickwork. Click https://www.bricklayerperthwa.com.au/ to learn more.
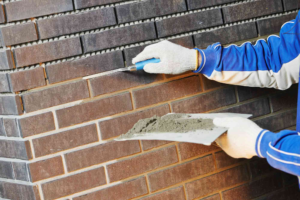
Brick laying can be quite a physically demanding profession, but it is also one of the most satisfying. There are a lot of different types of bricklaying jobs but most involve preparing and constructing walls, fences and other structures such as sheds and garages. The basic tools of the trade include pointed trowels, bolster chisels and club hammers. It is also helpful to have a spade and a tape measure. A hose pipe and bucket of water are also essential for mixing mortar and washing down the site.
Before starting the actual bricklaying, it is important to prepare a level line across the structure. This will ensure that each course of bricks is laid to a correct height and that the structure is straight. Using a spirit level and a plumb bob, a guideline should be made from the ground to the first course of bricks. The line should then be clamped or nailed to the guides at either end of the wall.
A good bricklayer will always be well prepared and have all of the necessary tools ready before beginning to build. This includes a spade, shovels and a wheelbarrow for carrying materials. The foundation for the structure may need to be poured if it isn’t on an existing slab or brick ledge. If this is the case, it should be laid out on a “dry run” to determine the exact dimensions for the finished structure.
Once all the necessary preparation is done, it is time to get started with the actual bricklaying. Depending on the type of project, a foundation may need to be laid before laying the bricks. This is particularly true for larger projects such as houses.
When it comes to making the mortar, it is vital that it is of the correct consistency. It should be wet enough to slide off a trowel but not so wet that it oozes out of the joints and takes forever to set. The right consistency can be difficult to achieve at first but will come with practice.
Once the mortar is mixed, it should be applied to the face of a buttered brick. Once this is done, the brick should be tapped gently with a hammer. The face of the brick should then be brushed with a foxtail brush to remove any surplus mortar and to smooth the surface.
Bricklaying is an art that requires commitment, a willingness to work outdoors, and excellent physical fitness. It can be learned in a few weeks or more if you’re prepared to put in the time. A good bricklayer will have a keen eye and an ability to spot problems before they become too big. Those who lack these skills will find themselves staring at a shifting brick wall that will eventually collapse under its own weight.
Assuming you have sized out your site, mixed your mortar, and obtained the correct PPE, it’s time to start building. Once your foundation footing has been poured and allowed to set, lay out the first course of bricks. Each brick should be spaced around 10mm apart to allow for your mortar. It’s important to remember that the bricks will be laid in a particular pattern, known as a bond. Two of the most common bonds are English and Flemish, both of which feature alternating rows of full bricks with half bricks at each end.
Using the measurements from your level and tape measure, mark out a guideline for your first course. This will help you ensure that each brick is laid at the same height and that your walls are straight. For the sake of convenience, it is also recommended that you use guideposts – timber boards driven into the ground at either end of your structure. This will make laying out the first course much easier by creating a reference point for each brick.
The most important tool of any bricklayer is their measuring tape. Choose one that is at least five meters long, with practical additions such as a belt clip and an automatic locking mechanism. Some models are even fashioned from washable fibreglass and can be adapted to suit different tasks, such as checking inside and outside corners or laying out square designs. Other essential tools for bricklaying include a variety of chisels, including cold chisels, fluted chisels, and electricians’ chisels. It is also vital to have a good quality trowel, which will be used to apply the mortar.
In bricklaying the word bedding is used to describe a layer of material under or between courses of bricks, bocks of stone or blocks of concrete. It might also be used to describe the material in a masonry foundation or footing. It can also refer to the mortar between courses of paving slabs or pavers. Bedding materials are a very important part of bricklaying, and they need to be very carefully specified and mixed so that they can achieve the performance required by the project.
The type of bedding material that is best for a specific task depends on the type of construction, the prevailing weather conditions and the working methods of the bricklayer. Some of the more common bedding materials include unbound sand or grit, a cement/sand mix and crushed rock.
Many people mistakenly assume that a sand/cement mix for bedding should have an extremely high cement content, and this is not always the case. For instance, for a paving application using flags (or pavers) that are bonded with a polymer, there is no need for a very high cement content in the bedding mortar. In fact, a semi-dry or dry mix is usually preferred because it tends to be less dusty and easier to work with. It also does not pick up and carry dirt from tools and boots, which can stain the flags.
Another thing to consider is the porosity of the bricks being used. It is important that they do not absorb too much water from the bedding mortar. This can cause the mortar to stiffen far too quickly and prevent the bricks from being bedded properly into it. It can also lead to the bricks sliding out of their face lines and sinking out of level. Pressed or extruded bricks with low porosity are best not dampened at all because it can cause them to float on the bedding mortar and be difficult to lay correctly.
The principals of plumb, level and square must be kept in mind at all times when constructing with brick. Even the finest materials, best tools, and greatest design cannot correct a structure put together contrary to these basic principles. Plumb is straight up and down, level is straight side to side, and square is when a plumb object intersects with a level one it creates a 90 degree angle.
To achieve a square and plumb structure, the foundation must be built correctly, to the exact height of the finished brick structure. In some cases, a brick ledge or footing may already be in place and this can serve as the foundation for the brick work. Otherwise a concrete footing or slab must be poured to the correct size, level and depth to support your brickwork.
Once the foundation is set, you can start building your brick walls. The first course, or row of bricks should be laid evenly using a spirit level to check each new section of the wall as it is built. Once you have completed the first course, use a string line or clamps and nails to create guideposts along the length of your construction. This will tell you the height of the next course of bricks to be laid. Keep in mind that it will be necessary to move this string line after each new course is built for your project to remain level.
When building walls, you will also need to stagger each brick as it is laid. This will avoid a line of weakness at each corner and will also help to ensure that the mortar joints are lined up properly for a strong brickwork.
To do this, use the same technique of buttering a new brick with your trowel and placing it alongside a half or turned brick on the previous course. Continue this pattern throughout the entire wall to ensure that you have a stepped appearance, with each end of the structure being built up a course higher than the center.
During the process of bricklaying, you will need to use several different tools and techniques to complete your project. Some of the most important are:
Understanding the Driveway Paving Process

A paved driveway adds value to your home and is an attractive property feature. There are many materials to choose from including poured concrete, asphalt, and pavers. Budget and style considerations guide material choices. Your climate should be factored in, too, since some materials handle the weather better than others.
Process
Driveway Paving Summerville SC is more visually appealing and easier to maintain than gravel. However, paving your driveway requires heavy equipment that most homeowners cannot access. It also requires professional paving contractors who have the expertise to ensure a quality finished product. This is why it is important to understand the paving process so that you can be an informed consumer.
First, the existing surface of the driveway is removed. This can involve saw-cutting the old surface and hauling it away for disposal. Next, the area is graded and pitched for proper drainage. This will prevent the water from pooling on the new surface and creating damage over time. Large driveways may need drains installed in strategic locations to manage water flow and minimize potential flooding issues.
Then, the sub-grade is prepared by spreading a layer of geo-textile fabric over the entire site. This material will prevent the soil from shifting when it freezes and thaws, which can create damage to the new pavement. Finally, the sub-grade is topped with a lift of runner-crush stone and compacted in place using heavy machinery. This forms the base of the new road and provides strength to the asphalt surface that will be laid over it.
Once the sub-grade is prepared and both lifts of runner-crush stone are put down, the binder course can be applied. This is the “weight-bearing” layer of asphalt that utilizes bigger aggregate sizes than the top course. We typically install this with a self-propelled paver and compact it with a dual drum roller to ensure a consistent, high-quality finish.
If your new pavement is joining an older paved or concrete surface, a “tack coat” is required to promote bonding and allow for smooth transitions. This is a thin liquid asphalt emulsion that is applied to the surface and then rolled over with a drum roller.
Once the tack coat has set, the final asphalt surface can be put down. We generally use a double-drum vibratory roller to achieve a high-quality finish that will last for years. It is important to work with your paving contractor to develop a maintenance plan that includes regular sweeping, washing, filling of cracks before they become too large and tending to foliage that could be carried by the wind and sprout in the cracks.
Materials
The type of material used to pave your driveway is a key consideration for both aesthetic and long-term performance. Popular paving materials include gravel, asphalt and concrete.
A good paving contractor can help you choose the right material for your driveway based on climate and geography. For example, the right paving materials will be flexible enough to withstand freeze-thaw cycles without damaging the sub-grade or leaving unsightly tire marks. They will also hold up well to salts that are needed to melt snow and ice.
Gravel is a durable and economical option that comes in various colors to complement your home. It is a permeable material that allows water to soak through, so the soil underneath can retain nutrients. Another environmentally friendly option is recycled gravel made from crushed concrete that would otherwise be thrown away.
Asphalt is a highly versatile material that is widely used for public roads and highways. It has a low initial cost, and requires very little maintenance beyond periodic resealing. It is also a popular choice for homeowners, as it holds up well to winter weather and resists cracking.
In order to create asphalt, a sub-grade is constructed, which can be made up of clay, sand, loam, or silt. This is then covered with a layer of 1″ minus stone, which is like regular runner-crush but more finely ground. Dependable Paving recommends a 10 inch thick stone base, which is installed in two lifts (or layers).
The first layer is called the binder course and is the weight-bearing component of the asphalt. This uses a smaller aggregate, usually quarters, nickels and dimes, than the top course, which is filled with larger pieces of aggregate. Both the binder course and the top course are installed over a geo-textile fabric, which prevents the underlying soil from sticking to the asphalt and causing premature wear.
Once the binder and top courses are installed, your paved surface is ready to be driven on! Over time, asphalt can become rutted, which is an unsightly and unsafe condition for both pedestrians and vehicles. Rutting can lead to mud, slush and ice that is hard to shovel and can cause cars to skid or spin. It’s important to maintain resealing on asphalt every two to four years to preserve the life of your driveway.
Cost
Homeowners have many options when it comes to paving their driveway. They can choose from a variety of materials, including gravel, asphalt, and concrete. In addition, they can select different colors and patterns to match their home. Choosing the right material is an important factor in determining how much the project will cost. The price of the material is typically the highest expense, but labor and square footage also contribute to the total cost.
Choosing the best paving contractor is an essential step in the process. Before hiring anyone, homeowners should request references from previous customers and check out their Better Business Bureau rating and online reviews. Additionally, they should ask if the contractor is licensed and insured. Finally, homeowners should get a detailed quote in writing from several contractors. This will help them compare prices and choose the best option for their budget.
The type of paving chosen will also affect the cost. For example, a concrete driveway is more expensive than a gravel one. Heated driveways are another high-end option that can add to the cost. Also, periodic maintenance can drive up the cost. For instance, a gravel driveway may be the cheapest to install, but it will require raking and replacing lost gravel regularly.
Paved and coated driveways are often a priority for owners of older homes. This is because they provide a safe and convenient way to enter and exit the house. They also offer a calming effect to the environment and can help maintain the value of the property.
In addition, paved and coated driveways are a great alternative to a traditional concrete or asphalt driveway. Compared to these, they are cheaper and easier to maintain. Moreover, they are durable and can withstand heavy traffic and weather conditions.
Whether your existing driveway is in good condition or needs to be replaced, resurfacing may be an affordable option. Resurfacing costs are typically less than replacing the entire driveway and are based on the site’s square footage. Resurfacing is also a great option for old or damaged asphalt driveways, as it preserves the base layer and only replaces the top surface.
Maintenance
Regardless of the material used, all driveways experience some wear and tear that necessitates preventive maintenance solutions. A paving contractor can help you decide what materials are best for your home and provide you with the right care to keep them looking great.
A concrete driveway is durable and requires little upkeep beyond occasional power washing and degreasing. However, the light color of a concrete driveway can stain easily and needs frequent cleaning to look its best. Asphalt is less susceptible to stains but requires routine sealing and resurfacing every three to five years.
Resurfacing your driveway involves replacing the top layer of the paved surface. It is a more cost-effective solution than a complete replacement and can restore your driveway to its original condition.
Asphalt and concrete need regular resealing to protect them from moisture penetration that can crack and freeze the surface, leading to heaves and potholes. Resealing also helps prevent oxidation of the pavement, which is most prevalent in exposed areas.
The resealing process involves preparing the paved surface, which includes eliminating stains and filling cracks. Then, your paving professional will apply the sealant and allow it to dry for up to 12 hours. It’s important to choose a quality sealant that is appropriate for your type of driveway.
Both paver and brick driveways should be regularly sealed with a product made specifically for these types of paving materials. Other generic products may actually contribute to a paver driveway’s deterioration.
It’s important to check for and repair any cracks in your paving surface, particularly those that appear as hairline fractures. Cracks that are left untreated can become larger and create safety hazards for vehicles and pedestrians.
Driveway paving is an excellent way to enhance your home’s curb appeal, but proper maintenance is essential to prolonging its lifespan. Routine resealing, crack repair and weed removal are just some of the steps that need to be taken to maintain your new driveway.
The driveway is a primary point of entry and exit for vehicles and pedestrians, and it’s also an important part of your property’s overall landscape. A properly maintained driveway will improve your home’s curb appeal and value and reduce the risk of accidents and damage to your vehicles and pedestrians.
Why Siding Repair Is Necessary
When siding is damaged, it allows outside elements into the home. Moisture leads to rot and mold, damaging the house’s internal structures, and increasing energy bills. A simple repair can be done by using a vinyl patch kit. Clean the area and trim down the patch’s curved edges to fit over the existing piece. For siding repair needs, contact Charleston Siding Repair.
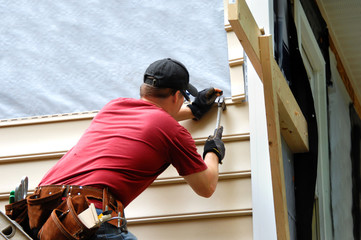
Cracks in the siding are the most common problem homeowners face. Whether caused by an expansion or contraction of the house or simply by natural wear and tear, cracks in the siding can be difficult to fix. Fortunately, if you catch the cracks early and act quickly, you can often save your vinyl siding from needing replacement.
First, you will need to remove the section of the siding above the cracked area. Use a zip tool, also known as a siding removal tool, to slide under the lip of the broken section and pull it out. This may take some work, but it will be worth it in the end.
Once you’ve removed the damaged section, clean the area using a sponge and some soapy water. Then, sand the surface of the remaining panel using a sanding block, making sure to use long, horizontal strokes. Sand the area 3 inches past each end of the crack to prepare it for filler.
Now, you’ll need to find a patch that matches the color of the rest of your home. You can purchase a vinyl patch kit from a hardware store, or you can use a piece of scrap siding you have. If you’re using a patch, you will want to cut it so that it’s slightly bigger than the hole or crack. You’ll need to test it out to make sure the curved edges fit well.
Next, put a bead of unsanded caulk into the crack and work it with a plastic putty knife to fill in the entire crack. When it dries, apply some blue or green painter’s tape to prevent the caulk from spreading outside of the crack onto the wall.
When you’re ready to finish, paint the patch using an exterior-grade latex paint that’s a close match to your existing color. It’ll take a day or two for the paint to dry, so don’t touch the repair until then. Now your repaired section of siding will look as good as new!
Blistering or bubbling
Blistering or bubbling in the siding is a serious sign that the insulation is no longer doing its job. This is caused by moisture seeping underneath the siding and penetrating the wallboard, causing mold, mildew or fungus to grow. These conditions are not only unsightly, but they can be harmful to your family’s health as well as cause structural damage to the home.
If you are seeing this problem, you may be able to fix it yourself by using a power washer to remove the buildup and then repainting the area. However, if this is a recurring issue then it’s probably time to consider getting new vinyl siding for your home. This will help to improve the insulation in your house, protect your valuables from the elements and even add value to your property.
Another common sign that the siding needs to be replaced is if you notice signs of rot or mold. This can be a result of many different things including weather, wildlife, or improper maintenance. The first sign of rot is usually small chips and cracks in the siding which then allows water to penetrate the boards and deteriorate them from the inside.
Other causes of rot include insects such as woodpeckers, termites or bees. The holes and burrows they create allow water to seep in and can also lead to mold, mildew or fungus growth which then weaken the underlying structure of the siding and the wallboard.
If the rot is advanced it can begin to affect the furring strips, wood sheathing and then eventually the studs in the walls of your home. If you’re noticing any signs of rot in the exterior of your home, it is imperative that you contact a siding repair expert right away so that they can come out and inspect the damage and offer an affordable solution.
Other signs that the siding is no longer providing adequate protection for your home include rippling, warping or bowing. These can be caused by a number of factors including improper installation, extreme heat or cold, and lack of proper drainage. For instance, vinyl siding is designed to hang relatively loosely from the wall and if it is nailed too tightly it will bulge and warp as the nail heads push against the hem of the vinyl. A quick test to see if this is the case is by choosing a section of your siding and seeing how it moves side to side.
Damage to the fascia
The fascia is the wooden board that runs along the edge of the roof and helps prevent water leaks, rot and other damage to the soffit, roofing and gutter systems. The fascia is also the seal for your attic space. This is important because it keeps pests like squirrels from accessing the attic space. The fascia is usually made of wood, but can be constructed from other materials such as aluminum, vinyl or composite boards.
Keeping an eye on your fascia boards is important because if they rot, you will need to replace them. One of the most common causes of fascia rot is a gutter system that doesn’t channel water correctly. This can lead to the gutters spilling over the front of the gutter and into the fascia. This can cause the fascia to rot and eventually give way.
Other causes of fascia rot are roof leaks, clogged gutters, mold, fungus and black algae. These growths love moist environments and can rot the fascia and damage your gutters and roof.
If you notice rotted fascia, you should first examine the area to determine how much of the board is damaged. You can use a screwdriver to test the integrity of the wood. If the screwdriver goes in easily, it is likely that the fascia is soft and needs to be replaced.
It is important to reframe the affected area before you put the new fascia in place. This will help ensure that the new fascia is firmly attached to the soffit and is level with the rest of the board. This will help prevent future problems with water, ice and snow.
Another way to repair the fascia is to caulk small divots and holes. This is an easy fix that can be completed in a few minutes. Simply use a caulking gun to apply a bead of waterproof caulk and wait for it to dry. Then, sand the caulking and paint it to match the existing color of your siding. If you notice a large hole or crack in the fascia, contact a local contractor for a siding repair estimate.
Increased heating and cooling bills
When siding isn’t repaired promptly, moisture can penetrate the surface and cause rot. This can compromise the structural integrity of your home, and if left unchecked, rot can also affect the roofing and framing. A professional inspector can check for rot and other signs of damage to the roof and framing, and make any necessary repairs before it becomes too severe.
Holes in your vinyl siding can indicate any number of issues that require a thorough inspection. The most common reason for these holes is insect activity, and woodpeckers in particular can be a problem for vinyl siding. While they may seem harmless, they can leave behind a hole large enough to let in moisture, which is the biggest culprit for most siding problems.
If you notice your heating or cooling bills increasing significantly, this could be another sign of a need for siding repair. This is because the gaps and cracks in your siding can allow air to escape, which will increase the cost of heating or cooling your home.
The best way to find out how serious the problem is with your vinyl siding is to call a local contractor for an inspection. They’ll be able to determine the root of the issue and recommend a solution.
Depending on the severity of the issue, your local contractor may suggest something as simple as filling in a small crack or repairing a damaged section. In other cases, they’ll recommend replacing the damaged section or removing the whole section and inspecting for moisture underneath. This will involve removing the siding and possibly the flashing or building paper, depending on what’s found.
If you need a new piece of siding to replace a damaged one, it’s important that it match the rest of your house. If you have leftover pieces from when your house was sided, they’ll likely fit perfectly, and you can take them to a paint store for color matching. Otherwise, you can take a sample of the current color of your vinyl and use that to create a match.
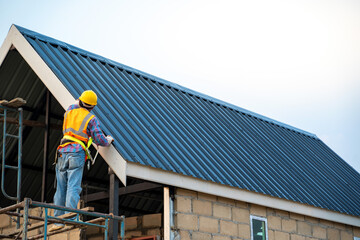
What Is a Roofing Expert?
Roofing Expert has years of experience in the roofing industry and is familiar with all the regulations specific to commercial roofs. They also know what materials to use and how to install them properly. These experts typically handle permitting and insurance requirements and conduct thorough inspections. This expertise allows them to complete the job promptly and efficiently.
Roofers also offer warranties to their clients, which is another good way to ensure that you don’t have any unplanned surprises down the line. Having a contract in place is the best way to avoid any disputes and is the only way to guarantee that all parties involved are on the same page.
Roofing experts have a wide swath of knowledge to draw from, from design and construction to maintenance and repair. The most impressive of all is their knowledge of the latest industry best practices and safety standards. These are all embodied in their company’s rigorous safety training program, ensuring that each job gets done right the first time.
Getting your hands on the top-notch quality roof isn’t cheap. Luckily, there are plenty of local and national companies to choose from. The right one will take the stress out of your property maintenance and repair needs. Make sure you get a quote before you start the process to avoid any unexpected costs.
The safety of everyone involved in a roofing project is always top priority. This means not only following OSHA guidelines, but also making sure to have proper emergency plans in place.
One of the most important measures a roofing team can take to protect themselves is to wear a hard hat and harness when on the roof. Working without these safety measures can lead to severe injuries and even death.
Another way to improve roofing safety is by using technology that helps roofers identify hazards on the jobsite and reduces injury risk. These tools can include biometric devices, GPS or location trackers and voltage detectors.
Another tool that can help ensure roofers’ safety is augmented reality. It allows contractors to create a detailed safety plan and then impose it over a virtual job site so employees can see the exact layout. This makes it easier for them to understand the details of the safety plan.
Roofing contractors should have a strong sense of accountability when it comes to their job. This means they should always make sure they are getting the best results, completing the project within their estimated time frame, and never over-quoting their clients. They also need to be honest with their customers about any unforeseen problems or delays that they may encounter, as well as material costs that they might have to pay. They should account for these things in their estimates, too.
In addition to a high level of expertise and safety, accountability is one of the most important aspects of a successful roofing business. When your team is accountable, they will be more engaged and work harder. This can lead to greater productivity and profitability for your company. If you’re having problems with your roofing contractors’ accountability, take a look at these five signs that it’s time to get more help. Then, take the steps to solve your problem and build a stronger roofing business.
One of the best ways to stand out from your competition is by delivering excellent customer service. Whether your business is a single-man operation or a large corporation, exceptional customer service is an essential part of your company’s success. Your customers are relying on you to make their lives easier, and you have to be sure that you can meet their needs at every stage of the sales cycle.
A roofing expert should deeply understand the different roofing materials, such as shingles, tiles, metal, and flat roofing systems. They should also be knowledgeable about different roofing styles and designs, as well as the latest industry standards and building codes.
Roofing experts may be called upon to provide advice and guidance on a variety of roofing-related issues, including roof maintenance, repair, and replacement. They may also provide expert testimony in legal cases involving roofing defects or disputes.
Overall, a roofing expert plays a critical role in ensuring that roofs are installed, repaired, and maintained properly, and can help property owners avoid costly and potentially dangerous roofing problems.
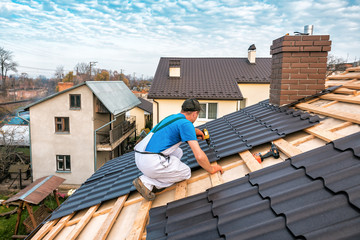
Finding Roofers Who Are Experienced
A roofer, roofing, or roof repair contractor is a trained tradesperson specializing in roof construction. Kent Roofing can repair, replace, and install roofing systems for residential buildings with various materials, such as asphalt shingles and metal. The most common roof type is the flat roof, which is typically made from concrete or tile. Most roofers have a basic knowledge of installing single-family residences and some multi-unit dwellings. The scope of a typical project will depend upon the size of the building and its condition.
Commercial roofers are typically involved in repairing roofs on commercial buildings. These roofs may be constructed out of concrete or other membrane material. The scope of work for commercial roofers is often much larger than residential projects, as they must install materials to cover the entire roof. For this reason it’s important to work with a licensed, bonded roofer to ensure that your commercial roof is sound and in good condition.
Industrial roofers are responsible for repairing roofs in manufacturing facilities. They install insulation and other components, as well as fix leaks and shingle tornadoes. Industrial roofers may also install roofs using hand tools or by using scaffolds. Scaffolds are large pieces of netting that hold dry materials together in scaffolding style. Both industrial and residential roofers can use scaffolds to help them perform their jobs safely. Scaffolds are available at most home improvement stores.
Homeowners may also hire roofing contractors, such as those who do roofing for private homes. Commercial contractors that work on residential homes will be familiar with the materials used in the typical house. These contractors will also know which types of shingles and other materials are used on a house as well as how to measure and install them. They will typically be familiar with the proper terms related to roofing including roof shingles and asphalt shingles. A homeowner may call up an industrial contractor one time to ask questions about materials they need for a new roof or to recommend a company for a job.
Roofing materials come in many different varieties. Everything from aluminum to steel and other synthetic materials are available. Each type of material has its own advantages and disadvantages. One type of roofing material, though, has become more popular due to the ease with which it can be installed and maintain – vapor barriers.
Vapor barriers are used when installing roofs in industrial and residential buildings. The reason for this is because they provide an incredible level of protection from the elements. A barrier will prevent moisture, snow, rain and ice from reaching the roof and making it fall in. A roof that is covered in a vapor barrier is one that is more resistant to damage from these elements. Roofers who are employed in commercial building projects usually use these to ensure the roofs they construct do not suffer from deterioration due to weather.
It is often the case when hiring a roofer that they have a great deal of experience with residential roofs. However, this should not mean that every roof construction contractor they employ has experience with residential roofs. This is simply not the case. Not all roofers have experience working with residential materials. In order to ensure that your roof is constructed correctly and up to code, you must make certain that you hire a licensed and insured contractor who has built hundreds of residential roofs. This way, you will know that the roofer you choose has experience with the type of roof you want installed.
In addition to having the right materials and expertise, you need to make sure that the roofer you hire has experience with rubber roof installation. Rubber roofing material is quite commonly used on commercial buildings but not all contractors have the proper skills and knowledge to install it properly. If the roofer you choose does not have experience with rubber roof installation, your roof could very well come apart in the middle of the night or day. This could result in a costly loss. On top of this, you may be putting your business at risk by allowing inexperienced or unlicensed workers to work on your commercial buildings. With all these things in mind, it is clear that you need to take a close look at any potential roofers you are considering for your commercial projects.
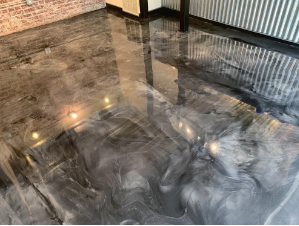
The Advantages and Disadvantages of Epoxy Floors
Epoxy Floors are an excellent choice for a variety of applications. They’re easy to install and maintain and can provide a beautiful, shiny finish. These floors are often used in industrial settings. You can learn more about this material by reading this article. Also, learn more about the benefits of epoxy flooring.
Epoxy flooring is an excellent option for many applications. This type of flooring is strong and durable, but it also has its drawbacks. First, it can be sensitive to humidity. This means that it needs to be installed properly to avoid any damage. Also, it may not be suitable for rooms that get low amounts of humidity. In addition, it is important to remember that epoxy flooring needs a minimum of 12 hours of drying time before it can be used.
Another benefit of epoxy flooring is that it is water-resistant and stain-resistant. This makes it ideal for bathrooms, sports complexes, and industrial settings. Epoxy flooring is also easy to clean, and it rarely warps or peels when exposed to water. In addition, it comes in a range of attractive colors and makes an attractive addition to any building.
Epoxy flooring is a moderately difficult project and can be installed by DIYers or professionals. Before installing epoxy, it is important to check the surface of the garage for moisture. You can check this by securing a plastic garbage bag on the floor. After 24 hours, you can remove the bag to see if the floor has accumulated any moisture. If it does not, it is not suitable for epoxy installation.
Another benefit of epoxy flooring is that it is cost-effective. It costs less per square foot than other flooring materials, and it can last for several years without needing repair. It is also resistant to bacteria and stains and it is also resistant to heavy foot and machine traffic.
Epoxy floors are highly durable and easy to maintain. Unlike other floors, they don’t peel or chip and are resistant to dust and cement particles. These floors are also resistant to scratching and are highly visible. However, you must be careful to protect them from damage. For this, you should apply paste wax on the floor on a regular basis. After applying the wax, you must buff it thoroughly until it is completely dry. This will protect the floor from scratches and provide a shiny finish.
When it comes to cleaning your epoxy floor, it’s best to avoid using natural cleaning products that will tarnish the finish. Natural cleaning products, such as lemon juice, contain limonene, which can erode the protective coating. Also, soap-based cleaners tend to leave behind residue that can further wear down the protective layer.
Solid epoxy floors offer a wide variety of colors. They can be used anywhere, from kitchens to living rooms. They’re easy to clean and provide a shiny finish. If you want a floor that will look good for a long time, you should consider installing epoxy flooring. These floors are excellent for high-traffic areas and can also withstand heavy lifting.
If you’re looking for a more decorative look, metallic epoxy flooring may be a good choice. The metallic additive in the epoxy allows for different designs. The most common design is a swirling pattern. To create this pattern, the installer uses brushes or rollers in a twisting motion. These types of floors are available in many colors, from gold and ruby to copper and silver. The metallic epoxy flooring also provides a matte finish.
Professionals take great care before and during the application process. Before applying epoxy, the experts will thoroughly clean the floor. This will prevent the flooring from peeling. It’s best to use water the day before the professional arrives. This will help the epoxy resin dry.
Why You Should Hire a Professional Electrician
Hiring a professional Electrician to perform electrical work is a good idea for several reasons. For one thing, a qualified electrician will make sure that all safety precautions are taken. Unless you are a licensed electrical contractor, working with power is dangerous and a wrong move could land you in the hospital. A qualified electrician will also arrive on time and be equipped with the proper tools and equipment. Furthermore, he or she will have the necessary extra parts on hand in case your electrical work requires them.
The first reason for hiring a professional electrician is safety. The work of working with electricity can be dangerous, especially if you don’t know what you are doing. Moreover, you may encounter various risks if you do not have the appropriate training and equipment. It’s also possible to make mistakes and endanger your safety. Therefore, it is best to leave the task to a professional. This way, you can be rest assured that you will receive quality service.
A professional electrician knows how to handle different electrical problems. These include rewiring a whole house or just one part. They also know how to install smart-home technology, such as lights. These special lights can control the lighting in your house. For instance, they can be controlled by a voice-activated speaker. This allows you to control them from anywhere you are. And because they are licensed electricians, you don’t have to worry about causing any danger to yourself.
An expert electrician knows how to identify electrical hazards and how to fix them safely. He or she also has the necessary tools to turn off electricity. In addition, an expert knows how to properly detect warped wires, which means you won’t be left in the dark. So, if you are in need of an electrical repair, you should hire an electrician. You’ll be glad you did. If you’re not sure what to do, it’s always a good idea to hire a professional.
A licensed electrician guarantees the safety of his or her work. Moreover, a licensed electrician will offer a warranty. In case of a problem, a quality electrical contractor will guarantee the safety and quality of their work. If a problem occurs, the warranty crew will fix it for free. An experienced, trained electrician will also be aware of the potential hazards of working with electricity. It’s best to hire an electrical expert only if you’re sure they’re qualified to do the job correctly.
A professional electrician can perform all types of electrical work. He or she must have a level 3 diploma and pass the relevant tests. An experienced electrician has experience and knowledge in electrical wiring. A licensed electrician can do any electrical job, including smart homes and electric devices. A qualified electrician can help you choose the most suitable device for your needs and install the best equipment. A skilled electrician can also handle emergency situations and provide you with a warranty. An insured professional has a valid license and is required by law.
In addition to installing electrical devices, a professional electrician can rewire a home. New wiring is more energy-efficient and cheaper than before. An electrician can also do small electrical jobs, including repairs. Lastly, an electrician is well-equipped to install smart-home technology. Some of these smart lights have special features that enable them to control other electrical equipment. These technologies can make life easier and save you money. A qualified electrician will ensure that the electrical system is working correctly and safely.
A professional certified electrician has extensive training in all types of electrical work, from small repairs to complete renovations. An experienced electrician can handle electrical work in any type of residence, from apartments to commercial buildings. They also have the skills to install new wiring that is more efficient and can reduce utility bills. So, whether you are looking for a commercial property, residential, or an apartment, a certified electrician can assist you. If you have a home with outdated electrical, it would be in your best interest to contact a certified professional electrical professional.
It is important to remember that hiring a professional electrician is always safe. Working with electricity can be dangerous without the right training and safety equipment. A professional electrician will know how to diagnose electrical problems and find the most appropriate solution for you. Aside from saving you money, hiring an electrician is a smart move for any home. You can trust their expertise and avoid the risk of electrical hazards. It is also better to be safe than sorry. There are many reasons to hire a professional electrical expert.