Brick laying requires skill, knowledge, and the right tools. The basic bricklaying tools include pointed trowels, bolster chisels, and club hammers.
Start by attaching a line along the ground where you want to build your wall. This will serve as a guide for both the height and straightness of the brickwork. Click https://www.bricklayerperthwa.com.au/ to learn more.
Brick laying can be quite a physically demanding profession, but it is also one of the most satisfying. There are a lot of different types of bricklaying jobs but most involve preparing and constructing walls, fences and other structures such as sheds and garages. The basic tools of the trade include pointed trowels, bolster chisels and club hammers. It is also helpful to have a spade and a tape measure. A hose pipe and bucket of water are also essential for mixing mortar and washing down the site.
Before starting the actual bricklaying, it is important to prepare a level line across the structure. This will ensure that each course of bricks is laid to a correct height and that the structure is straight. Using a spirit level and a plumb bob, a guideline should be made from the ground to the first course of bricks. The line should then be clamped or nailed to the guides at either end of the wall.
A good bricklayer will always be well prepared and have all of the necessary tools ready before beginning to build. This includes a spade, shovels and a wheelbarrow for carrying materials. The foundation for the structure may need to be poured if it isn’t on an existing slab or brick ledge. If this is the case, it should be laid out on a “dry run” to determine the exact dimensions for the finished structure.
Once all the necessary preparation is done, it is time to get started with the actual bricklaying. Depending on the type of project, a foundation may need to be laid before laying the bricks. This is particularly true for larger projects such as houses.
When it comes to making the mortar, it is vital that it is of the correct consistency. It should be wet enough to slide off a trowel but not so wet that it oozes out of the joints and takes forever to set. The right consistency can be difficult to achieve at first but will come with practice.
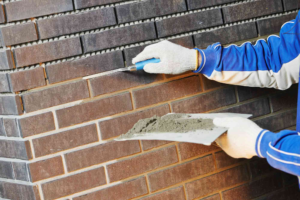
Once the mortar is mixed, it should be applied to the face of a buttered brick. Once this is done, the brick should be tapped gently with a hammer. The face of the brick should then be brushed with a foxtail brush to remove any surplus mortar and to smooth the surface.
Bricklaying is an art that requires commitment, a willingness to work outdoors, and excellent physical fitness. It can be learned in a few weeks or more if you’re prepared to put in the time. A good bricklayer will have a keen eye and an ability to spot problems before they become too big. Those who lack these skills will find themselves staring at a shifting brick wall that will eventually collapse under its own weight.
Assuming you have sized out your site, mixed your mortar, and obtained the correct PPE, it’s time to start building. Once your foundation footing has been poured and allowed to set, lay out the first course of bricks. Each brick should be spaced around 10mm apart to allow for your mortar. It’s important to remember that the bricks will be laid in a particular pattern, known as a bond. Two of the most common bonds are English and Flemish, both of which feature alternating rows of full bricks with half bricks at each end.
Using the measurements from your level and tape measure, mark out a guideline for your first course. This will help you ensure that each brick is laid at the same height and that your walls are straight. For the sake of convenience, it is also recommended that you use guideposts – timber boards driven into the ground at either end of your structure. This will make laying out the first course much easier by creating a reference point for each brick.
The most important tool of any bricklayer is their measuring tape. Choose one that is at least five meters long, with practical additions such as a belt clip and an automatic locking mechanism. Some models are even fashioned from washable fibreglass and can be adapted to suit different tasks, such as checking inside and outside corners or laying out square designs. Other essential tools for bricklaying include a variety of chisels, including cold chisels, fluted chisels, and electricians’ chisels. It is also vital to have a good quality trowel, which will be used to apply the mortar.
In bricklaying the word bedding is used to describe a layer of material under or between courses of bricks, bocks of stone or blocks of concrete. It might also be used to describe the material in a masonry foundation or footing. It can also refer to the mortar between courses of paving slabs or pavers. Bedding materials are a very important part of bricklaying, and they need to be very carefully specified and mixed so that they can achieve the performance required by the project.
The type of bedding material that is best for a specific task depends on the type of construction, the prevailing weather conditions and the working methods of the bricklayer. Some of the more common bedding materials include unbound sand or grit, a cement/sand mix and crushed rock.
Many people mistakenly assume that a sand/cement mix for bedding should have an extremely high cement content, and this is not always the case. For instance, for a paving application using flags (or pavers) that are bonded with a polymer, there is no need for a very high cement content in the bedding mortar. In fact, a semi-dry or dry mix is usually preferred because it tends to be less dusty and easier to work with. It also does not pick up and carry dirt from tools and boots, which can stain the flags.
Another thing to consider is the porosity of the bricks being used. It is important that they do not absorb too much water from the bedding mortar. This can cause the mortar to stiffen far too quickly and prevent the bricks from being bedded properly into it. It can also lead to the bricks sliding out of their face lines and sinking out of level. Pressed or extruded bricks with low porosity are best not dampened at all because it can cause them to float on the bedding mortar and be difficult to lay correctly.
The principals of plumb, level and square must be kept in mind at all times when constructing with brick. Even the finest materials, best tools, and greatest design cannot correct a structure put together contrary to these basic principles. Plumb is straight up and down, level is straight side to side, and square is when a plumb object intersects with a level one it creates a 90 degree angle.
To achieve a square and plumb structure, the foundation must be built correctly, to the exact height of the finished brick structure. In some cases, a brick ledge or footing may already be in place and this can serve as the foundation for the brick work. Otherwise a concrete footing or slab must be poured to the correct size, level and depth to support your brickwork.
Once the foundation is set, you can start building your brick walls. The first course, or row of bricks should be laid evenly using a spirit level to check each new section of the wall as it is built. Once you have completed the first course, use a string line or clamps and nails to create guideposts along the length of your construction. This will tell you the height of the next course of bricks to be laid. Keep in mind that it will be necessary to move this string line after each new course is built for your project to remain level.
When building walls, you will also need to stagger each brick as it is laid. This will avoid a line of weakness at each corner and will also help to ensure that the mortar joints are lined up properly for a strong brickwork.
To do this, use the same technique of buttering a new brick with your trowel and placing it alongside a half or turned brick on the previous course. Continue this pattern throughout the entire wall to ensure that you have a stepped appearance, with each end of the structure being built up a course higher than the center.
During the process of bricklaying, you will need to use several different tools and techniques to complete your project. Some of the most important are: